Monday, March 11, 2013

Fresh Harvest Delivered

A good friend of mine posted a video of this company Fresh Harvest Delivered on facebook recently. They deliver organic fresh (mostly local) fruits and vegetables. With no long term contract, and at $37 for a standard bin, it was well within our grocery budget, so I did not hesitate to sign up! 

I was blown away the first week! We had blood oranges and kale in the bin, and I found a kale & blood orange salad recipe on pinterest, and it was AMAZING!!! We've been ordering bins from there for about a month now, and I've realized a standard bin is really too much food for us, so I've moved down to their "mini" bin at $27 a bin (per week). Every few weeks I may order a bigger bin, but it's more for a family with one or two young kids at home. 

Here is what we're getting on Tuesday, I'll post our meals that use food from the bin later in the week. 

ItemQuantity
ARUGULA1 bunch(es)
Sweet POTATOES1 lb(s)
CARROTS1 bunch(es)
Hass AVOCADO4 pc(s)
Blueberries BERRIE1 package(s)
ZUCCHINI1 lb(s)
Red Slicer TOMATOES1 lb(s)
Golden Delicious APPLES2 pc(s)


Past recipes this month include the kale and blood orange salad, roasted cabbage (in Trader Joe's Tuscan Italian dressing), tempura vegetables (fell in love with purple carrots), and kung pao collard spring rolls with red onion and green pepper, with parsley roasted red potatoes. 

The great news is I plan on cutting our grocery budget by $10-$20/week by ordering our groceries, using pinterest for recipes, and keeping a well-stocked pantry. That's $40-$80/month!! I've been tracking our recipes we've tried on pinterest, but some of the recipes are our own and I want to keep up with them so I don't forget them! So I'll be posting those here. 

Wednesday, June 20, 2012

Hand-Painted Pillows and.. No Internet?!?!

I know...it's been a while!

My husband and I decided to try getting rid of TV/internet for a while. Our apartment complex has a business center (that has FREE lattes), and so we've been using their internet for the time being.

It may sound archaic, and it's definitely a little inconvenient, but the benefits we've seen make a case for not getting it back again anytime soon.

We may change our mind during football season, but for now it's looking good. We don't waste as much time on facebook, email, hulu, and watching pointless TV. We spend more time together, and we have to walk whenever we want to check our email, blog, or other things. Now, my husband does have a smart phone, so important weather or news updates we get that way (and he has access to his work emails). That may be what makes this a little more do-able. But in any case, I do like not having internet and TV at home. Being a housewife there is always huge temptation to spend time watching TV or wasting hours on the internet. Now I have to plan my internet time and that makes my work more efficient!

///

Okay, now onto the fun, crafty stuff:

Recently I made some pillows for our living room! We were so blessed to be given furniture when we got married! Though it didn't all match, and wasn't necessarily our style. So I thought I'd paint some pillows to help tie things together. I really loved this process and so I captured a few moments of the creating!

These are the fronts to the big blue ones:


And this is mid-painting of the monogram pillow:


Here are the fronts laid on the couch (to make sure I liked the size):
In this photo you can see the reason for the big blue pillows! -- A big blue futon! :)


And now for the stuffing and sewing!:


I don't like limp pillows, so I stuffed them REALLY full!


I used a sewing machine for 3 sides, and the corners of the 4th side.

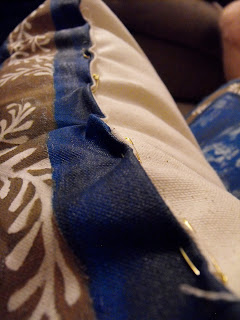
Used safety pins to hold the opening closed while I hand sewed the last bit.

And Viola!

An this is the monogrammed pillow.

And one of them all together!

I absolutely loved making pillows! I have them for sale right now on my shop, if you're interested in something like this.


Okay, that's all for now! Soon I'll have a fantastic bagel recipe for you, and pics. from our anniversary road trip! (Yep, this time we managed to bring out the camera every once in a while!)

Have a great Wenesday!


Wednesday, April 25, 2012

Homemade Turkey Burgers (& buns!)

So between pizza, and burgers, I know you're thinking the gluten free train has long departed our lives. And you'd be right. I'm not knocking the idea, but it just didn't work for us. (Plus after trying these homemade burger buns, I know I can't ever give gluten up completely!)

But what's a good bun if the burger is dry, or flavorless, right? Well I have the answer there too. I have fallen in love with one turkey burger recipe. It's probably one of 2 recipes that has ever been repeated since our marriage. It's from Cooking Yourself Thin and it is amazing! Full of great chile flavor, and the perfect amount of structure & moisture. (I know "moisture" isn't normally an appetizing word, but I don't have a better word to describe the opposite of dry-ness in a burger)

It's also super simple. 

Just mix 1 lb. lean ground turkey and 1 small can of diced green chiles and 1 egg in a bowl.

(They'll seem super mushy, but they'll cook up great!) 

Divide the mixture into 4 rounds, and cook on an open lean machine, until the bottom edge turns grey. 

Then slowly close the grill (these will lose their shape quickly if you smash them in the grill too early).

They will flatten out some, but that's okay. 

Then put them on your homemade burger buns, with a slice of Muenster cheese, and voila! 


Here is the homemade bun recipe (adapted from Smitten Kitchen)

Makes 4 buns!

1 large egg (divided)
1 2/3 cups wheat flour
3/4 teaspoons salt
1 1/4 tablespoons unsalted butter, softened


In a glass measuring cup, combine:
1 cup warm water 
1 1/2 tablespoons warm milk 
1 teaspoons active dry yeast
1 1/4 tablespoons sugar
Let stand until foamy, about five minutes.
Meanwhile, beat one egg.

In a large bowl, whisk together:
1 2/3 cups wheat flour
3/4 teaspoons salt


Add 1 1/4 tablespoons softened unsalted butter and rub into flour between your fingers, making crumbs.

Stir in yeast mixture and half the beaten egg until a dough forms.

Scrape dough onto clean, well-floured counter and knead until smooth and elastic, 8 to 10 minutes.

Add flour if too sticky, but allow it to remain somewhat sticky.

Shape dough into a ball and return it to bowl.

Cover bowl with plastic wrap and let rise in a warm place until doubled in bulk, one to two hours.

Line a baking sheet with wax or parchment paper. 

Divide dough into 4 equal parts.

Gently roll each into a ball and arrange two to three inches apart on baking sheet.

Cover loosely with a towel and let buns rise in a warm place for another half hour.

Set a large shallow pan of water on oven floor.

Preheat oven to 400 degrees with rack in center.

Beat remaining egg with 1/2 tablespoon water and brush some on top of buns.

Bake, turning sheet halfway through baking, until tops are golden brown, about 15 minutes.

Transfer to a rack to cool completely.


We ate these burgers with these teriyaki sweet potatoes from Budget Bytes.

Goodness, I'm getting hungry again just thinking about them!!

Wednesday, April 18, 2012

Refrigerator Pizza

I try to plan our weekly menus. I really do. It helps us save money, only buy what we need, helps us to eat healthy, and spend as much time together as possible. 

Last night I had a healthy grilled chicken dinner planned to cook, and then once the love of my life came home from work, I realize... we were having pizza!

I think I've mentioned before how irresistible pizza has become to my husband and me. 

(Luckily he went for a run after he got home, so I had time to whip out a quick pizza dough recipe and change plans completely.)

Since I decided to make pizza on a whim, it was going to have to be a "refrigerator pizza" (meaning the type of pizza toppings I was going to make, was going to be decided by whatever was left over in the refrigerator).

I had already grilled chicken for my planned menu, so I figured that was going to be the main thing on the pizza. We had plenty of cheese or some reason, so then I thought "Stuffed-crust"! Luckily we had barbeque sauce, and bacon. So it was decided. Barbeque chicken & bacon stuffed-crust pizza! (this might have been the best unplanned dinner I have ever made!)


In a medium bowl, dissolve:
1 packet of dry active yeast
1 teaspoon white sugar 
in 1 cup of warm water (110 degrees F) .

Let stand until creamy (10 minutes).

Stir in:
2 1/2 cups flour
1 teaspoon salt
2 Tablespoons Olive Oil

Beat until smooth. 

Let stand 5 min. 

Roll out dough on a floured surface. 

After I had the dough rolled out, I placed it on the greased baking sheet with dough hanging off the edges, as if I were making a pie (a pizza pie).

Then I sprinkled mozzarella cheese around the inside edge of the pan. (Our stuffed-crust didn't turn out like delivery stuffed-crust. I'm thinking there's a trick to it, like they use string cheese or grease the inside of the dough so the cheese doesn't quite get cooked into the dough- as ours did. If any one knows the trick, let me know! This version was still delicious though!)


And then I folded over the edges of the dough. Pressing down the edges, again like pie dough. 


Once that part was finished, I spread the Bulls-eye original barbeque sauce.


Topped with mozzarella and extra sharp cheddar cheeses.


Added 1 grilled chicken breast (cubed).


Last, but definitely not least, bacon pieces (pre-packaged from Publix). 


Baked in the oven at 400 degrees F just long enough for the dough to crisp up, and the cheese to bubble (about 10 min.).


And there it is...


Again... this pizza was sooo good!! Normally unplanned or otherwise "creative" meals don't turn out so well here. But this one will be made again!


Wednesday, March 14, 2012

Gluten free?

Everyone's talking about "going gluten-free". Some have to because of health issues, others are doing it by choice because of the health benefits.

We are skeptical of most all fad diets, but we've been hearing so many good things about the way people are feeling after eliminating gluten or wheat flour from their diet. 

We decided to try it. Mind you we have one foot in and one foot out. Basically our version of this is to have the food in our home be gluten-free, and then if we have to eat out we'll try to stick to it, but we don't beat ourselves up if it's too difficult. Last week (during the week) we stayed relatively gluten-free. (My husband had 0 glutens, I cheated a little) 

Anyways, it wasn't that difficult. And we did feel good. I think what we noticed more was how bad we felt when we did eat glutens again on the weekend. So we're trying it again this week. 

Lunches are the hardest thing to do gluten free. You have to be creative. Last week we did curry chicken lettuce wraps (unfortunately no picture, but they were really good!), and this week is chicken salad on portobellos. (and of course some other gluten-free snacks).

I was thrilled when I saw this chicken salad recipe on pinterest. I adapted it a little, and was able to get away with out using any mayo! (Mayo is naturally gluten-free, but I've just always tried to stay away from it because of it's fat and calorie content.)

2 cups shredded chicken
1 avacado
2 tsp. chopped cilantro
Salt to taste
dash of lemon pepper


I put the chicken salad on roasted portobellos. I highly recommend this. The flavor of the no-mayo chicken salad is a little different than you'd expect, but tastes perfect on a portobello. 


I was afraid I'd get green chicken salad doing this, but the chicken holds it's color really well!


When you taste these, you won't be able to believe there's no mayo!


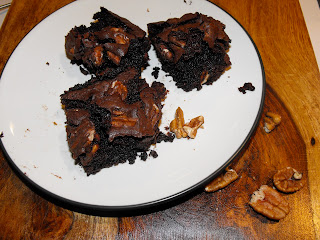
And we made these semi-homemade turtle brownies last night! We used the Betty Crocker gluten-free brownie mix, added some pecans and drizzled caramel sauce on top! Mmm...


So far the gluten-free thing ain't so bad!